The Pioneers Who Made It Possible

Gus Grissom

Neil Armstrong

Edwin "Buzz" Aldrin

Jim Lovell
Mission: GT-XII · November 11, 1966

John Young
Mission: GT-X · July 18, 1966

Michael Collins

Eugene Cernan
The Specifications That Power It
Recommended Engines
Launch System
with 3/16 in. Maxi™ Launch Rod
Launch Rod Size
Max Altitude

Length
Diameter
Weight
Fin Material
Recovery System

Dual Engine Cluster Performance
The Gemini Titan is powered by a two-engine cluster configuration. Using a pair of C5-3 motors, the necessary thrust required for launch is achieved through simultaneous engine ignition. Both igniters are wired in parallel, allowing electrical current from the Pro Series II launch controller to reach each motor at the same time for synchronized ignition.
When both engines fire together, their thrust is additive, generating over 40N (9lbs) of force to lift this larger, highly detailed scale model with ease. This balanced output is critical, as even slight variations in ignition timing can influence the rocket’s overall flight trajectory.
Experience a liftoff where precision and power come together in a single, decisive moment.
The Details That Define It
The Mind Behind the Mission
When I was a kid, I was exposed to the awe inspiring world of space travel by my father. Some of my core memories were when I was excited and impatient with my eyes glued to the TV watching a Space Shuttle launch. As the engines roared to life, I could not help but cheer and jump around at the amazing sight. Looking back, it is these moments that molded me into who I am today. For that, I cannot thank my father enough.
My father sharing this experience with me was his way of paying it forward to the next generation, whether he knew it or not. To this day he will tell me stories of how he was glued to the TV during the Mercury, Gemini, and Apollo programs just as I was during the Shuttle program. Just as my dad paid it forward to me, I strive to pay it forward to the next generation by paying homage with this kit to ensure the history of the Gemini program is not lost.
The initial development of a new kit is easily the most exciting part of a project, and this held true for the 1:48 Gemini Titan. After determining that the Pro Series II 2.5 inch tube was the perfect diameter for the kit, I then specified the tube lengths based on how I wanted to split up the parts of the kit.
The most tedious phase of the design process, and the most enjoyable for me, is designing all the plastic parts for the kit. After some initial designs and testing, it was determined that it was not feasible to have the capsule and interstage be resin 3D printed. This led to the injection molded multi piece design seen today.
In making these multi piece designs there were three things I kept in mind, make the parts easy to assemble, accurate to the kit scale, and durable when assembled. To ensure these criteria were met, there were many 3D printed prototypes used to validate the parts.
Once the 3D printed parts were test assembled, the rocket was then simulated with Open Rocket to ensure that the included clear fins would be properly sized. This would then lead to the construction of the first full assemblies of the rocket. Validating the assembly of each component is crucial in developing the instructions.
After many exciting test flights, the parts were sent to be tooled and the instructions began. Months later, with instructions complete and samples of the parts in house, the first sample of the kit could be assembled using real parts. This phase exposed some refinements that were required with the instructions for the lock ring installation. This step is easily the trickiest part of the entire build.
After many test flights of the samples, the kit design was complete and I was able to assemble and paint the first pre production sample. I could not be happier to pay respect to such an influential rocket in the history of the Space Race. This rocket kit was rapidly developed and refined after testing. This was the same mindset used when converting the Titan II missile to the Gemini platform. Furthermore, this is the same mindset that we see today from SpaceX, Blue Origin, and many others.
Just as my father’s small acts influenced me to be who I am today, I strive to inspire the next generation to work hard and do great things through kits like this. Each generation has its milestones that will never be forgotten through history. Whether it is landing on the Moon or recovering a booster the size of a skyscraper, these events shaped our history just like we are shaping our future. Dream big, work hard, and make history.
Clear Skies,
Adam Knippa


DESIGNED TO BE DISPLAYED


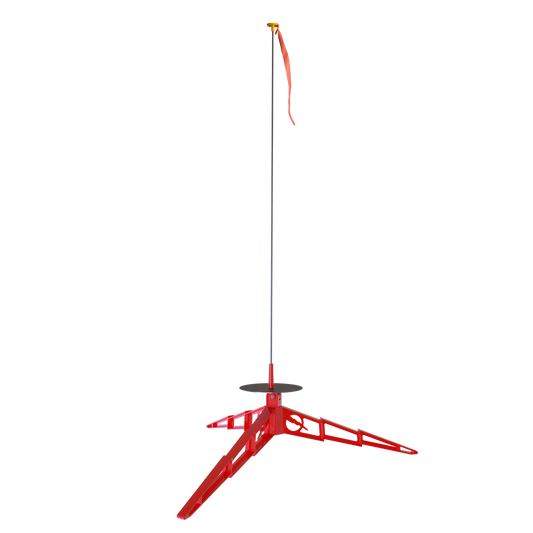
The Gemini Titan includes a premium display stand designed to present the model in a true vertical orientation. A centered support post secures the rocket at its base, creating a stable foundation while preserving the full, uninterrupted flight profile from tip to engine cluster.
By elevating the model above the surface, the stand allows the entire vehicle to be viewed without obstruction. From the sculpted engine nozzles to the upper stage transitions, every detail remains clearly visible, giving the finished build the presence of a launch-ready vehicle rather than a stored model.
Command attention with a display that turns your finished build into a statement of history, precision, and purpose.